
Figure 1. The Futon welcome screen
図1 Futonへようこそ
In this chapter, we’ll take a quick tour of CouchDB’s features, familiarizing ourselves with Futon, the built-in administration interface. We’ll create our first document and experiment with CouchDB views. Before we start, skip to Appendix D, Installing from Source and look for your operating system. You will need to follow those instructions and get CouchDB installed before you can progress.
本章では、CouchDBに内蔵されている管理用のインターフェースを使用して、「Futon」に慣れるための簡単なツアーを行います。CouchDBに最初のドキュメントを登録して、ビュー機能を試してみます。話を進める前に、付録を参照して使用しているオペレーティングシステムに適した方法でCouchDBをインストールしておいてください。
We’ll have a very quick look at CouchDB’s bare-bones Application Programming Interface (API) by using the command-line utility curl. Please note that this is only one way of talking to CouchDB. We will show you plenty more throughout the rest of the book. What’s interesting about curl is that it gives you control over raw HTTP requests, and you can see exactly what is going on “underneath the hood” of your database.
私たちは、コマンドライン・ユーティリティーのcurlを使用して、CouchDBで公開されているアプリケーション・プログラミング・インタフェース(API)を簡単に確認することが出来ます。注意して欲しいのは、ここで紹介する方法はCouchDBと通信する方法のほんの一例です。この本の残りの部分で、いろいろな通信方法をご紹介するつもりです。curlを使用すると、低レベルのHTTPリクエストを制御することができます。つまり、データベースとの通信内容の「胸の内」を確認することができるのです。
Make sure CouchDB is still running, and then do:
CouchDBが正常に動作している状態で、こんなコマンドを実行します:
curl http://127.0.0.1:5984/
This issues a GET request to your newly installed CouchDB instance.
これは、新しくインストールしたCouchDBインスタンスへのGETリクエストです。
The reply should look something like:
CouchDBからの応答はこのようになるはずです:
{"couchdb":"Welcome","version":"0.10.1"}
Not all that spectacular. CouchDB is saying “hello” with the running version number.
CouchDBから、挨拶と共に動作しているバージョンの応答があるだけで、そんなに大したことはありません。
Next, we can get a list of databases:
次に、データベースの一覧を取得します:
curl -X GET http://127.0.0.1:5984/_all_dbs
All we added to the previous request is the _all_dbs string.
_all_dbsという文字列は、以前に追加したデータベースを取得する要求です。
The response should look like:
応答はこんな感じになるでしょう:
[]
Oh, that’s right, we didn’t create any databases yet! All we see is an empty list.
そうです、まだ何もデータベースを作っていないのですから!空のリストが表示されます。
The curl command issues GET requests by default. You can issue POST requests using curl -X POST. To make it easy to work with our terminal history, we usually use the -X option even when issuing GET requests. If we want to send a POST next time, all we have to change is the method.
curlコマンドはデフォルトでGETリクエストを発行します。POSTリクエストを発行したい場合は、curl -X POSTとしてコマンドを実行します。ですが、コマンドの実行履歴から別の作業が行いやすいように、GETリクエストを発行するときも-Xオプションをつけてコマンドを実行しています。GETリクエストを発行した後、POSTリクエストを発行したいときは、コマンドの実行履歴のGETをPOSTに変えるだけですみますから。
HTTP does a bit more under the hood than you can see in the examples here. If you’re interested in every last detail that goes over the wire, pass in the -v option (e.g., curl -vX GET), which will show you the server curl tries to connect to, the request headers it sends, and response headers it receives back. Great for debugging!
HTTP通信は、ここで例として提示している裏側でいろいろなことを行っています。もし、HTTP通信が裏側でやってくれていることに興味があるのなら、curl -vX GETのように-vオプションをつけてcurlでサーバーに接続してみてください。リクエストヘッダーやレスポンスヘッダーが表示されると思います。なんてすばらしいデバッグなんでしょう!
Let’s create a database:
データベースを作りましょう:
curl -X PUT http://127.0.0.1:5984/baseball
CouchDB will reply with:
CouchDBからの応答は:
{"ok":true}
Retrieving the list of databases again shows some useful results this time:
再度データベースのリストを取得すると、今回は良い結果を返してくれます。
curl -X GET http://127.0.0.1:5984/_all_dbs
["baseball"]
We should mention JavaScript Object Notation (JSON) here, the data format CouchDB speaks. JSON is a lightweight data interchange format based on JavaScript syntax. Because JSON is natively compatible with JavaScript, your web browser is an ideal client for CouchDB.
話を進める前に、CouchDBのデータ形式であるJavaScript Object Notation(JSON)について説明しておきます。JSONはJavaScriptの構文を基にした軽量なデータ交換形式です。JSONはJavaScriptと互換性があるので、WebブラウザーはCouchDBにとって理想的なクライアントとなります。
Brackets ([]) represent ordered lists, and curly braces ({}) represent key/value dictionaries. Keys must be strings, delimited by quotes ("), and values can be strings, numbers, booleans, lists, or key/value dictionaries. For a more detailed description of JSON, see Appendix E, JSON Primer.
括弧 ([]) は表示順序を表し、中括弧 ({}) はkey/valueの辞書を表します。キーは文字列で引用符 (") で区切り、値は文字列、数値、真偽値、リスト、又はkey/valueの辞書を保持することができます。JSONの詳細な説明については、付録のJSON Primerを参照してください。
Let’s create another database:
別のデータベースを作ってみましょう:
curl -X PUT http://127.0.0.1:5984/baseball
CouchDB will reply with:
CouchDBからの応答は:
{"error":"file_exists","reason":"The database could not be created, the file already exists."}
We already have a database with that name, so CouchDB will respond with an error. Let’s try again with a different database name:
既に同じ名前のデータベースが存在するので、CouchDBはエラーを返します。別のデータベース名でもう一度試してみましょう:
curl -X PUT http://127.0.0.1:5984/plankton
CouchDB will reply with:
CouchDBからの応答はこうなるはずです:
{"ok":true}
Retrieving the list of databases yet again shows some useful results:
再度データベースのリストを取得してみます:
curl -X GET http://127.0.0.1:5984/_all_dbs
CouchDB will respond with:
CouchDBからの応答は:
["baseball", "plankton"]
To round things off, let’s delete the second database:
元に戻すため、二番目のデータベースを削除しましょう:
curl -X DELETE http://127.0.0.1:5984/plankton
CouchDB will reply with:
CouchDBからの応答は:
{"ok":true}
The list of databases is now the same as it was before:
データベースの一覧は、以前と同じになります:
curl -X GET http://127.0.0.1:5984/_all_dbs
CouchDB will respond with:
CouchDBからの応答は:
["baseball"]
For brevity, we’ll skip working with documents, as the next section covers a different and potentially easier way of working with CouchDB that should provide experience with this. As we work through the example, keep in mind that “under the hood” everything is being done by the application exactly as you have been doing here manually. Everything is done using GET, PUT, POST, and DELETE with a URI.
簡潔さのために、ドキュメント操作の説明を省きました。次の章で、これまでと異なるCouchDBの簡単な操作方法を紹介します。これからサンプルを紹介しますが、アプリケーションの見えない部分で、今まで手動で実行してきたことと同様の操作が行われていることを覚えておいてください。全ての操作は、GET, PUT, POSTそして、DELETEメソッドとURIを使用して実行することができます。
After having seen CouchDB’s raw API, let’s get our feet wet by playing with Futon, the built-in administration interface. Futon provides full access to all of CouchDB’s features and makes it easy to work with some of the more complex ideas involved. With Futon we can create and destroy databases; view and edit documents; compose and run MapReduce views; and trigger replication between databases.
CouchDBの純粋なAPIに触れたので、Futonに内蔵されている管理ツールを試してみましょう。FutonはCouchDBの主要な機能への完全なアクセスと、複雑な発想を簡単に制御するための方法を提供します。Futonを使用することで、データベースの作成や削除、ドキュメントの閲覧や編集、MapReduceビューの作成や実行、そしてデータベース間のレプリケーションを実行することができます。
To load Futon in your browser, visit:
ブラウザにFutonを表示するため、以下のURLを表示してください:
http://127.0.0.1:5984/_utils/
If you’re running version 0.9 or later, you should see something similar to Figure 1, “The Futon welcome screen”. In later chapters, we’ll focus on using CouchDB from server-side languages such as Ruby and Python. As such, this chapter is a great opportunity to showcase an example of natively serving up a dynamic web application using nothing more than CouchDB’s integrated web server, something you may wish to do with your own applications.
もし、CouchDBのバージョン0.9以降を実行しているなら、図1のような画面が表示されると思います。これ以降の章では、RubyやPythonのようなサーバーサイドの言語からCouchDBを使用することに焦点を当てていきます。そのため、この章はCouchDBに内蔵されているWebサーバーのみを使用した、生粋のWebアプリケーションの例を紹介する良い機会です。自分自身のアプリケーションを早く作ってみたいと思うでしょうが、お付き合いください。
The first thing we should do with a fresh installation of CouchDB is run the test suite to verify that everything is working properly. This assures us that any problems we may run into aren’t due to bothersome issues with our setup. By the same token, failures in the Futon test suite are a red flag, telling us to double-check our installation before attempting to use a potentially broken database server, saving us the confusion when nothing seems to be working quite like we expect!
インストール直後最初に行うことは、正しくインストールが完了しているか確認するために、テストスイートを実行することです。テストスイートは、今後厄介な問題が発生したとしても、セットアップ時の問題ではないことを保障してくれます。また、Futonのテストスイートは、インストールに失敗している場合は、赤いチェックを表示してくれます。チェックを行うことで、CouchDBが自分たちが予期した動作を行ってくれないといった混乱を避けることができるのです!
Figure 1. The Futon welcome screen
図1 Futonへようこそ
Some common network configurations cause the replication test to fail when accessed via the localhost address. You can fix this by accessing CouchDB via http://127.0.0.1:5984/_utils/.
localhostアドレスでアクセスすると、レプリケーションのネットワーク設定テストがいくつか失敗してしまいます。CouchDBにhttp://127.0.0.1:5984/_utils/でアクセスすることで、この問題を回避することができます。
Navigate to the test suite by clicking “Test Suite” on the Futon sidebar, then click “run all” at the top to kick things off. Figure 2, “The Futon test suite running some tests” shows the Futon test suite running some tests.
FutonのサイドバーにあるTest Suiteをクリックすると、テストスイート画面に移動します。次に、画面の上にあるrun allをクリックします。図2はFutonのテストスイートがいくつかのテストを実行している様子です。
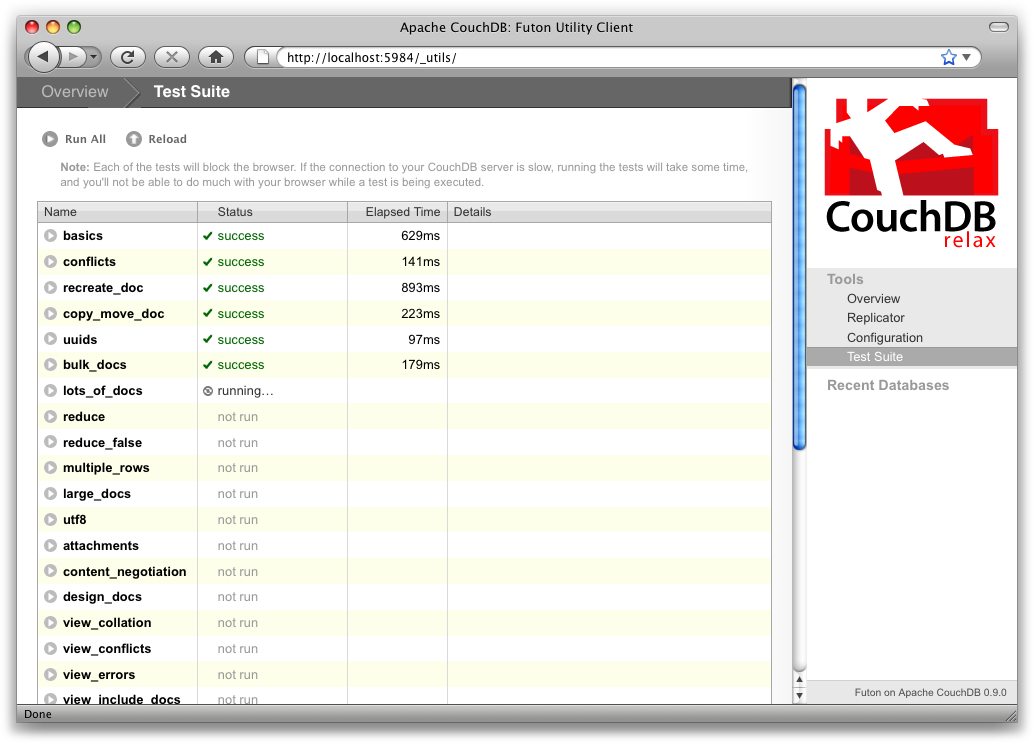
Figure 2. The Futon test suite running some tests
図2 Futonテストスイート実行中
Because the test suite is run from the browser, not only does it test that CouchDB is functioning properly, it also verifies that your browser’s connection to the database is properly configured, which can be very handy for diagnosing misbehaving proxies or other HTTP middleware.
テストスイートをブラウザーで実行する理由は、CouchDBが正常に機能しているかの確認だけではありません。プロキシやそのほかのHTTPミドルウエアが誤動作せず、ブラウザーとデータベースの接続が正しく行えているかの確認になります。
If the test suite has an inordinate number of failures, you’ll need to see the troubleshooting section in Appendix D, Installing from Source for the next steps to fix your installation.
テストスイートが複数失敗する場合は、次のステップに進む前に付録のInstalling from Sourceのトラブルシューティングを参照して修復してください。
Now that the test suite is finished, you’ve verified that your CouchDB installation is successful and you’re ready to see what else Futon has to offer.
テストスイートが完了したら、CouchDBのインストールは成功しています。Futonが持っている機能を確認する準備ができました。
Creating a database in Futon is simple. From the overview page, click “Create Database.” When asked for a name, enter hello-world and click the Create button.
Futonからデータベースを簡単に作成できます。Overviewのページで、Create Databaseをクリックしてください。データベース名の入力を求められるので、hello-worldと入力し、Createボタンをクリックします。
After your database has been created, Futon will display a list of all its documents. This list will start out empty (Figure 3, “An empty database in Futon”), so let’s create our first document. Click the “Create Document” link and then the Create button in the pop up. Make sure to leave the document ID blank, and CouchDB will generate a UUID for you.
Futonでデータベースを作成すると、図3のようにデータベースに保存されている全てのドキュメントの一覧が表示されます。データベース作成直後は何も登録されていませんので、ドキュメントを作成しましょう。Create Documentのリンクをクリックすると、Createボタンのあるポップアップが表示されます。ドキュメントIDを空白にすると、CouchDBが自動的にUUIDを付与します。
For demoing purposes, having CouchDB assign a UUID is fine. When you write your first programs, we recommend assigning your own UUIDs. If your rely on the server to generate the UUID and you end up making two POST requests because the first POST request bombed out, you might generate two docs and never find out about the first one because only the second one will be reported back. Generating your own UUIDs makes sure that you’ll never end up with duplicate documents.
デモが目的の場合、CouchDBが自動的にUUIDを割り当ててくれる機能は便利です。しかし、プログラムを作成する場合は、プログラムから独自のUUIDを割り当てる方式をお勧めします。なぜなら、サーバーでUUIDを生成する方式の場合の問題点として、最初にPOSTで通信したが応答がなく、再度POSTで通信してドキュメントを登録した場合を考えます。二つともドキュメントの登録に成功していた時、プログラムで取得できるUUIDは二番目に登録したドキュメントのものだけで、最初に登録したドキュメントのUUIDはもう見つけることができないかもしれません。プログラム中でUUIDを生成する場合には、このようなドキュメントの重複問題は発生しません。
Futon will display the newly created document, with its _id and _rev as the only fields. To create a new field, click the “Add Field” button. We’ll call the new field hello. Click the green check icon (or hit the Enter key) to finalize creating the hello field. Double-click the hello field’s value (default null) to edit it.
作成したばかりのドキュメントは、_idと_revのフィールドだけFutonに表示されていると思います。Add Fieldボタンをクリックすると、新しいフィールドを作成できます。helloという新しいフィールドを作成しました。緑色のアイコンをクリックするかエンターキーを押すと、helloフィールド作成が完了します。helloフィールドのvalueをダブルクリックすると値の入力が行えます(初期値はnullです)。
If you try to enter world as the new value, you’ll get an error when you click the value’s green check icon. CouchDB values must be entered as valid JSON. Instead, enter "world" (with quotes) because this is a valid JSON string. You should have no problems saving it. You can experiment with other JSON values; e.g., [1, 2, "c"] or {"foo":"bar"}. Once you’ve entered your values into the document, make a note of its _rev attribute and click “Save Document.” The result should look like Figure 4, “A “hello world” document in Futon”.
helloの値にworldと入力しようとすると、エラーが表示されると思います。CouchDBの値は有効なJSON形式でなくてはいけません。"world"(引用符付き)と入力すると保存できます。引用符をつけることで、JSON形式で有効な文字列と認識されたからです。[1, 2, "c"]や{"foo":"bar"}等、JSON形式の値を試してみてください。ドキュメントに登録した値は、Save Documentをクリックすると_revに記録されます。結果は図4のようになるはずです。

Figure 3. An empty database in Futon
図3 Futonで見た空のデータベース
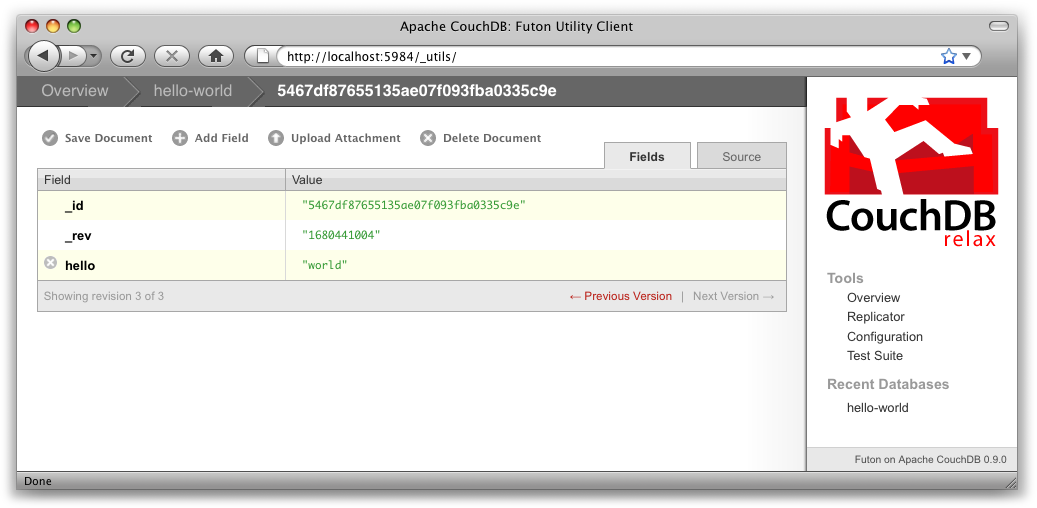
Figure 4. A “hello world” document in Futon
図4 Futonで見た"hello world"ドキュメント
You’ll notice that the document’s _rev has changed. We’ll go into more detail about this in later chapters, but for now, the important thing to note is that _rev acts like a safety feature when saving a document. As long as you and CouchDB agree on the most recent _rev of a document, you can successfully save your changes.
_revの値が変更されたことがわかると思います。後の章で詳しく説明しますが、この時点で重要なことは_revがドキュメントを保存するとき安全機構のように動作するという点です。CouchDBが提示する最新のドキュメントの_revに従えば、正常にドキュメントの変更を保存することができます。
Futon also provides a way to display the underlying JSON data, which can be more compact and easier to read, depending on what sort of data you are dealing with. To see the JSON version of our “hello world” document, click the Source tab. The result should look like Figure 5, “The JSON source of a “hello world” document in Futon”.
また、Futonはよりコンパクトでデータのソートや判読が簡単な、元のJSON形式のデータを表示する方法も提供しています。SourceタブをクリックするとHello WorldドキュメントがJSON形式で表示されます。表示される結果は図5のようになります。
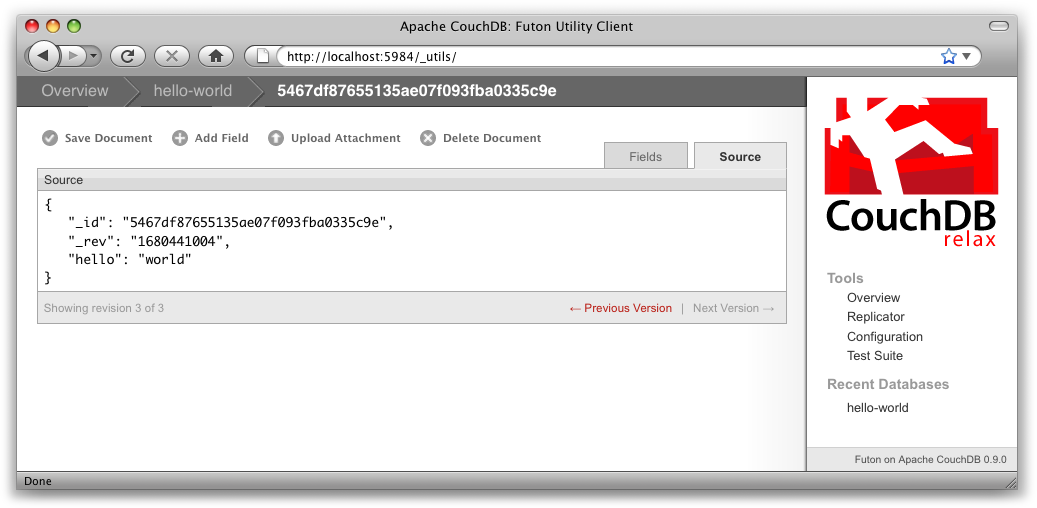
Figure 5. The JSON source of a “hello world” document in Futon
図5 Futonで表示した"hello world"ドキュメントのJSONソース
Traditional relational databases allow you to run any queries you like as long as your data is structured correctly. In contrast, CouchDB uses predefined map and reduce functions in a style known as MapReduce. These functions provide great flexibility because they can adapt to variations in document structure, and indexes for each document can be computed independently and in parallel. The combination of a map and a reduce function is called a view in CouchDB terminology.
従来のリレーショナルデータベースは、データが正しく構造化されていれば、どのようなクエリーでも実行することができます。しかし、CouchDBはMapReduce方式として知られている、事前に定義したmapとreduce関数を用いた方式を使用します。この方式はとても柔軟な対応が行えます。なぜならドキュメントの構造の変化に順応でき、処理を独立させて並行して処理を実行することが可能だからです。mapとreduce関数の組み合わせをCouchDBの用語でviewと表現します。
For experienced relational database programmers, MapReduce can take some getting used to. Rather than declaring which rows from which tables to include in a result set and depending on the database to determine the most efficient way to run the query, reduce queries are based on simple range requests against the indexes generated by your map functions.
経験豊富なリレーショナルデータベースプログラマは、MapReduceにすぐに慣れることができます。データベースに応じて、どのテーブルのどの行に結果が含まれているかを取得するもっとも効率的なクエリーの実行方法を考えるよりも、作成したmap関数によって生成されるインデックスに対して、範囲を指定し絞込みを行うほうが簡単ですから。
Map functions are called once with each document as the argument. The function can choose to skip the document altogether or emit one or more view rows as key/value pairs. Map functions may not depend on any information outside of the document. This independence is what allows CouchDB views to be generated incrementally and in parallel.
map関数は、ドキュメント毎にそのドキュメントを引数として一回だけ呼び出されます。関数でドキュメントを完全に読み飛ばすか、出力するか、またはkey/valueのペアを列として表示するかを選ぶことができます。map関数はドキュメント以外の情報に依存しません。この独立性により、CouchDBのviewは同時実行数を増やすことを可能にしています。
CouchDB views are stored as rows that are kept sorted by key. This makes retrieving data from a range of keys efficient even when there are thousands or millions of rows. When writing CouchDB map functions, your primary goal is to build an index that stores related data under nearby keys.
CouchDBのviewは、キーによりソートされ行として保存されています。こうすることで、キーの影響範囲が数千または数百万行に及ぶ場合でも、データを取得できるようになります。CouchDBのmap関数を作成するにあたり、まず最初に試してみることは、保存しているデータのキーに関連したインデックスを作成することです。
Before we can run an example MapReduce view, we’ll need some data to run it on. We’ll create documents carrying the price of various supermarket items as found at different stores. Let’s create documents for apples, oranges, and bananas. (Allow CouchDB to generate the _id and _rev fields.) Use Futon to create documents that have a final JSON structure that looks like this:
MapReduceのviewを試してみる前に、データを登録しておく必要があります。異なるスーパーマーケットで見つけた、様々な品物の情報をを掲載するドキュメントを作成します。りんご、オレンジ、そしてバナナに関するドキュメントを作成してみましょう(_idと_revはCouchDBに自動生成させます)。Futonを使用してドキュメントを作成します。最終的なJSONの構造はこうなります:
{
    "_id" : "bc2a41170621c326ec68382f846d5764",
    "_rev" : "2612672603",
    "item" : "apple",
    "prices" : {
        "Fresh Mart" : 1.59,
        "Price Max" : 5.99,
        "Apples Express" : 0.79
    }
}
This document should look like Figure 6, “An example document with apple prices in Futon” when entered into Futon.
このドキュメントをFutonで入力したものが図6になります。
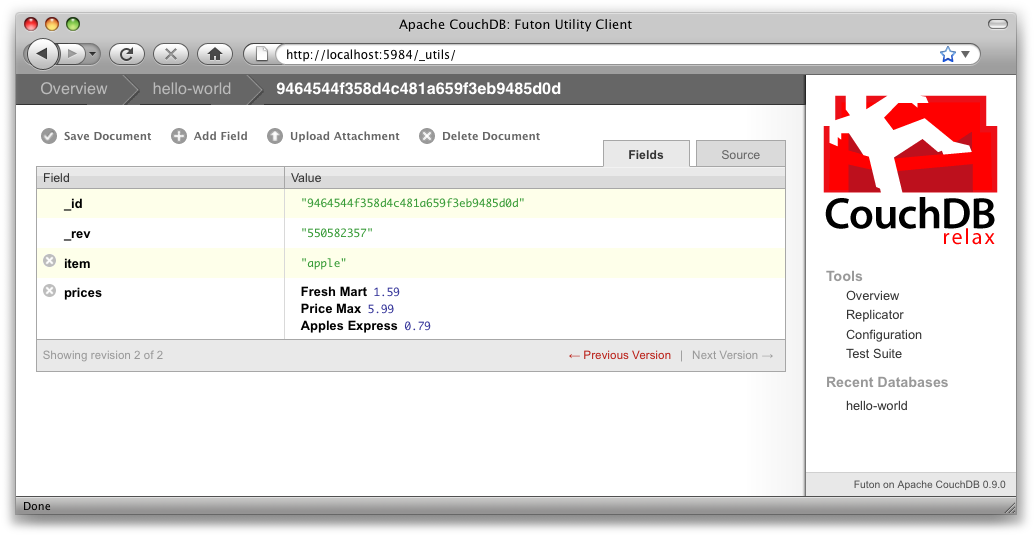
Figure 6. An example document with apple prices in Futon
図6 Futon上でのりんごの価格ドキュメントの例
OK, now that that’s done, let’s create the document for oranges:
さあ、りんごの登録は終わりました。次はオレンジのドキュメントを作成します:
{
    "_id" : "bc2a41170621c326ec68382f846d5764",
    "_rev" : "2612672603",
    "item" : "orange",
    "prices" : {
        "Fresh Mart" : 1.99,
        "Price Max" : 3.19,
        "Citrus Circus" : 1.09
    }
}
And finally, the document for bananas:
最後に、バナナのドキュメントです:
{
    "_id" : "bc2a41170621c326ec68382f846d5764",
    "_rev" : "2612672603",
    "item" : "banana",
    "prices" : {
        "Fresh Mart" : 1.99,
        "Price Max" : 0.79,
        "Banana Montana" : 4.22
    }
}
Imagine we’re catering a big luncheon, but the client is very price-sensitive. To find the lowest prices, we’re going to create our first view, which shows each fruit sorted by price. Click “hello-world” to return to the hello-world overview, and then from the “select view” menu choose “Temporary view…” to create a new view. The result should look something like Figure 7, “A temporary view in Futon”.
大規模な昼食会を開催すると想像してください。お客様は非常に価格に厳しい方です。一番安い品物を見つけるため、果物毎に価格でソートした結果を表示するviewを作成しましょう。hello-worldをクリックし、hello-worldのOverviewに戻ります。そして、viewのメニューからTemporary view…を選択し、新しいviewを作成します。結果は図7のようなります。

Figure 7. A temporary view in Futon
図7 Futonで見たtemporary view
Edit the map function, on the left, so that it looks like the following:
以下のように、左側のmap関数を編集します:
function(doc) {
    var store, price, value;
    if (doc.item && doc.prices) {
        for (store in doc.prices) {
            price = doc.prices[store];
            value = [doc.item, store];
            emit(price, value);
        }
    }
}
This is a JavaScript function that CouchDB runs for each of our documents as it computes the view. We’ll leave the reduce function blank for the time being.
CouchDBはドキュメント毎に、viewであるこのJavaScript関数の処理を実行します。reduce関数はしばらくの間空白のままとしておきます。
Click “Run” and you should see result rows like in Figure 8, “The results of running a view in Futon”, with the various items sorted by price. This map function could be even more useful if it grouped the items by type so that all the prices for bananas were next to each other in the result set. CouchDB’s key sorting system allows any valid JSON object as a key. In this case, we’ll emit an array of [item, price] so that CouchDB groups by item type and price.
Runをクリックすると、価格でソートされた様々なアイテムの情報が、図3-8のように表示されると思います。項目のタイプ別にまとまっていれば、このmap関数はもっと役立つかも知れません。それなので、全ての結果に品名と価格を表示するよう変更してみます。CouchDBは、キーの並び替えにどんなJSONオブジェクトでも指定することが可能です。この例では、[item, price]の配列をキーに指定することで、CouchDBは品名と価格でグループ化してくれます。
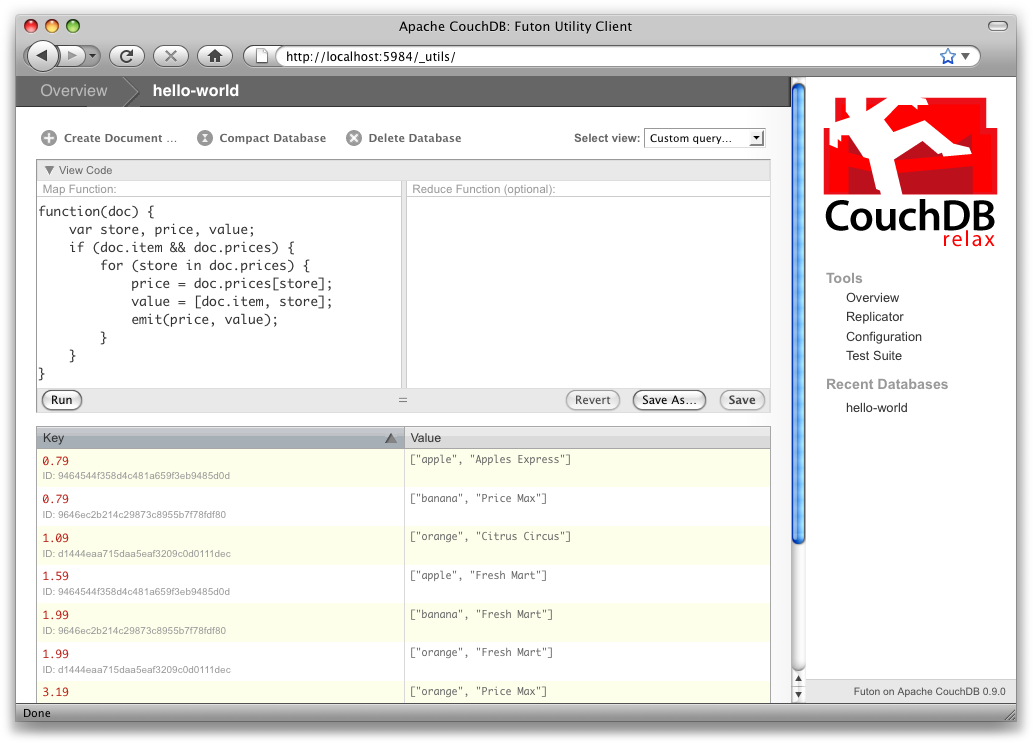
Figure 8. The results of running a view in Futon
図8 Futonでのviewの処理結果の表示
Let’s modify the view function so that it looks like this:
viewを以下のように変更してみましょう:
function(doc) {
    var store, price, key;
    if (doc.item && doc.prices) {
        for (store in doc.prices) {
            price = doc.prices[store];
            key = [doc.item, price];
            emit(key, store);
        }
    }
}
Here, we first check that the document has the fields we want to use. CouchDB recovers gracefully from a few isolated map function failures, but when a map function fails regularly (due to a missing required field or other JavaScript exception), CouchDB shuts off its indexing to prevent any further resource usage. For this reason, it’s important to check for the existence of any fields before you use them. In this case, our map function will skip the first “hello world” document we created without emitting any rows or encountering any errors. The result of this query should look like Figure 9, “The results of running a view after grouping by item type and price”.
この関数は、まずドキュメントに処理に使用するフィールドが存在するかチェックを行っています。CouchDBは独立したmap関数でエラーが発生した場合でも、正常に復帰します。map関数が定期的に失敗する場合(必須のフィールドの不足や、その他のJavaScriptの例外)、CouchDBは無駄なリソースの消費を避けるため、そのmap関数を切り離します。そのため、ちゃんと関数内で使用するフィールドの存在を確認することはとても重要です。この例では、作成したmap関数は最初に登録した"hello world"ドキュメントをスキップし、エラーの発生を回避しています。このmap関数の実行結果は図9のようになります。
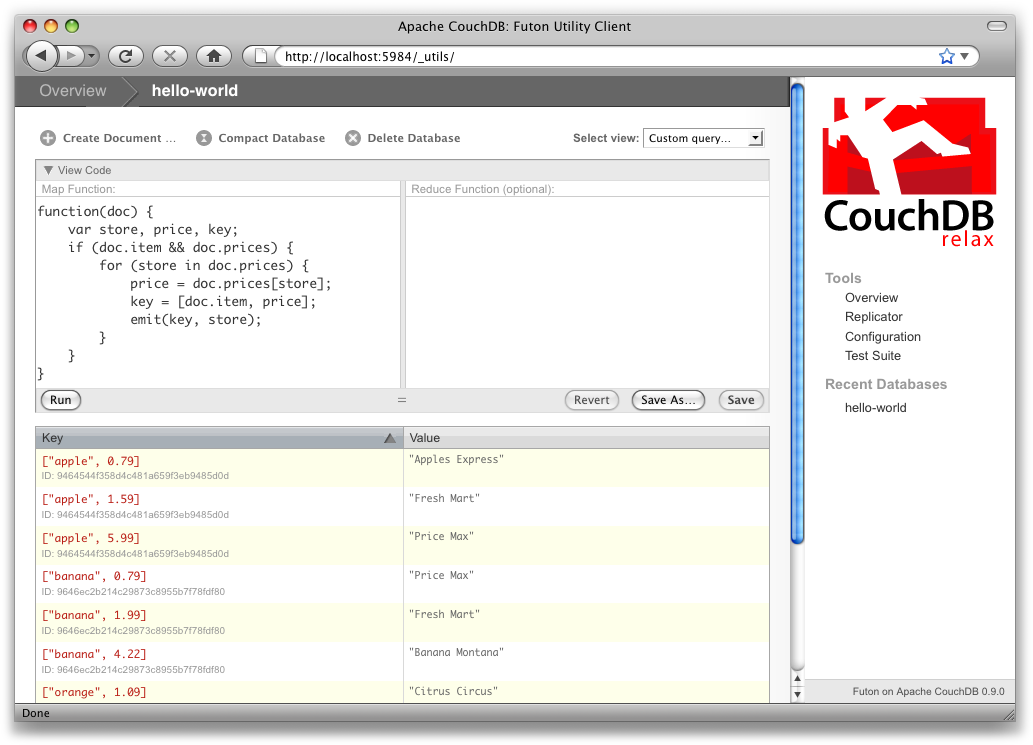
Figure 9. The results of running a view after grouping by item type and price
図9 項目と価格でまとめる処理に変更した後の実行結果
Once we know we’ve got a document with an item type and some prices, we iterate over the item’s prices and emit key/values pairs. The key is an array of the item and the price, and forms the basis for CouchDB’s sorted index. In this case, the value is the name of the store where the item can be found for the listed price.
ドキュメントを価格順にkey/valueの組み合わせで取得することができました。キーは品名と価格の配列で、CouchDBがソート済みのインデックスを提供してくれます。値は、表示している価格で品物を購入できる店の名前です。
View rows are sorted by their keys—in this example, first by item, then by price. This method of complex sorting is at the heart of creating useful indexes with CouchDB.
行はそれぞれのキーでソートされています。この例では最初に品名、そして価格でソートされています。この複雑なソートは、CouchDBの有能なインデックス生成技術の賜物です。
MapReduce can be challenging, especially if you’ve spent years working with relational databases. The important things to keep in mind are that map functions give you an opportunity to sort your data using any key you choose, and that CouchDB’s design is focused on providing fast, efficient access to data within a range of keys.
何年もリレーショナルデータベースを使用して仕事をしていたのなら、MapReduceはやりがいがあると思います。重要なことは、map関数を使用することでデータに存在するどのキーでもソートすることが可能であることです。CouchDBは、キーの範囲内ですばやく、効率的にデータにアクセスすることに焦点を当てて設計されています。
Futon can trigger replication between two local databases, between a local and remote database, or even between two remote databases. We’ll show you how to replicate data from one local database to another, which is a simple way of making backups of your databases as we’re working through the examples.
Futonは二つのローカルデータベース間、ローカルとリモートのデータベース間、そしてリモートとリモートのデータベース間のレプリケーションを実行することが可能です。データベースのバックアップを作成する簡単な例として、ひとつのローカルデータベースを別なローカルデータベースに複製してみます。
First we’ll need to create an empty database to be the target of replication. Return to the overview and create a database called hello-replication. Now click “Replicator” in the sidebar and choose hello-world as the source and hello-replication as the target. Click “Replicate” to replicate your database. The result should look something like Figure 10, “Running database replication in Futon”.
最初に、レプリケーションの対象となる空のデータベースを作成する必要があります。Overviewに戻り、hello-replicationという名前のデータベースを作成します。サイドバーにあるReplicatorをクリックし、複製元にhello-world、複製先にhello-replicationを選択します。Replicateをクリックすると、データベースのレプリケーションが実行されます。結果は図10のようになります。
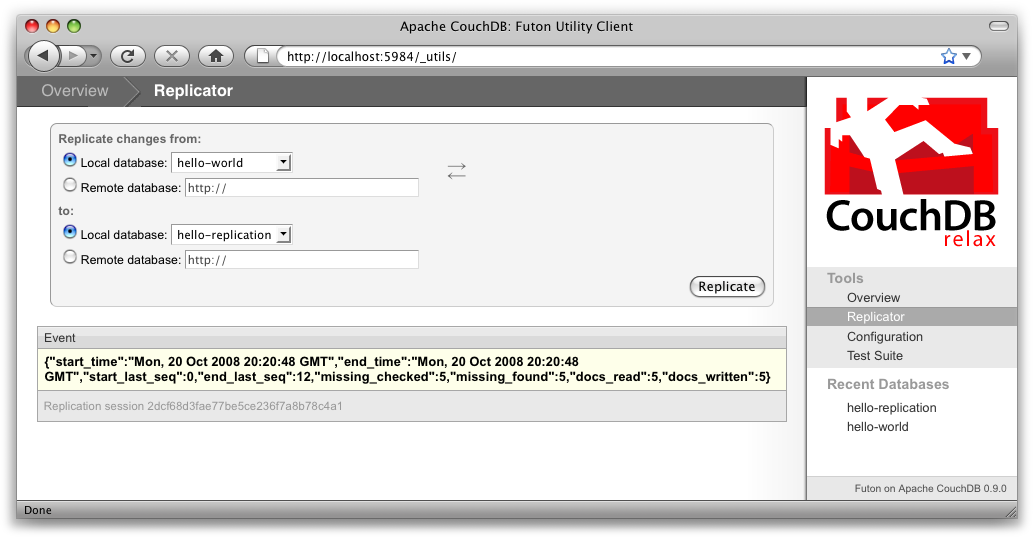
Figure 10. Running database replication in Futon
図10 Futonからデータベースのレプリケーションを実行
For larger databases, replication can take much longer. It is important to leave the browser window open while replication is taking place. As an alternative, you can trigger replication via curl or some other HTTP client that can handle long-running connections. If your client closes the connection before replication finishes, you’ll have to retrigger it. Luckily, CouchDB’s replication can take over from where it left off instead of starting from scratch.
大きなデータベースでは、レプリケーションに時間がかかります。注意点として、レプリケーションが実行されているときにブラウザを閉じないでください。これを避ける方法として、curlや長時間コネクションを保持することができるHTTPクライアントを使用して、レプリケーションを実行することができます。もし、レプリケーションが終了する前にコネクションを切断してしまった場合は、再度レプリケーションを実行してください。幸いにも、CouchDBのレプリケーションは中断した箇所から再開されます。
Now that you’ve seen most of Futon’s features, you’ll be prepared to dive in and inspect your data as we build our example application in the next few chapters. Futon’s pure JavaScript approach to managing CouchDB shows how it’s possible to build a fully featured web application using only CouchDB’s HTTP API and integrated web server.
Futonの重要な機能は確認できました。この章で学んだことを用いて、次章から紹介するサンプルアプリケーションを作成する時、データの構造を確認することができると思います。FutonのJavaScriptだけを使用してCouchDBを管理する試みは、CouchDBのHTTP APIと内蔵のWebサーバーのみでアプリケーションの開発が可能であることを示す良い例だと思います。
But before we get there, we’ll have another look at CouchDB’s HTTP API—now with a magnifying glass. Let’s curl on the couch and relax.
しかし、その事例を示す前に、CouchDBのHTTP APIを詳細に確認したいと思います。ソファーの上に寝そべり、リラックスしていきましょう。